In this guide, you’ll learn how to ensure the best results from your printer by conducting tests and fine-tuning your settings. Whether you’re a beginner or experienced, this article will provide valuable insights and tips to enhance your printing experience. From understanding the importance of resin test prints to troubleshooting common issues, we’ll cover it all. Get ready to unlock the full potential of your 3D printer test with this practical guide.
Importance and Benefits of Resin Test Prints
Resin test prints are essential for calibrating and optimizing your resin 3D printer. These test prints play a crucial role in identifying and resolving issues with 3d test print quality, such as problems with layer adhesion and curing. By fine-tuning printer settings like exposure time and layer height, test prints enable you to achieve optimal results. Toto macau They also help determine the most suitable resin type and brand for specific applications. Additionally, test prints allow you to evaluate the accuracy and level of detail achievable with your resin printer.
There are various types of resin test prints available. Calibration cubes are simple geometric shapes that assess dimensional accuracy and print consistency. Benchy boats are popular test prints that evaluate overall print quality, including surface finish and overhang performance. Miniatures and figurines test the printer’s ability to replicate intricate details and fine features. Functional parts, such as gears or hinges, are used to assess mechanical properties and durability. Artistic sculptures showcase the printer’s capability to create visually appealing and intricate designs.
When designing resin test prints, consider factors like support structures, orientation, hollowing, test print size, and surface finish variations. Troubleshooting resin test prints involves analyzing failed prints, addressing layer adhesion issues, adjusting exposure time and curing settings, and resolving warping and distortion problems. Resources for resin test prints include online repositories, community forums, manufacturer guidelines, user-created models, and iterative testing.
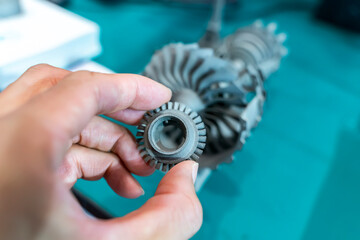
Types of Resin Test Prints
When choosing resin test prints, it’s important to consider the different types available to evaluate the capabilities of your 3d printer test prints. Calibration cubes are simple geometric shapes that help assess dimensional accuracy and print consistency. Benchy boats, on the other hand, are popular test prints that evaluate overall print quality, including surface finish and overhang performance.
Miniatures and figurines are complex models that test the printer’s ability to reproduce intricate details and fine features. Functional parts, such as gears or hinges, are test prints that assess mechanical properties and durability. Lastly, artistic sculptures showcase the printer’s capability to create visually appealing and intricate designs.
Design Considerations for Resin Test Prints
To ensure successful resin test prints, consider the placement of support structures to prevent sagging and ensure optimal results. Support structures are essential for maintaining the shape and stability of the test print during the 3d printing tests process. They provide additional support to overhanging or intricate parts of the design that may otherwise collapse or deform. When designing the placement of support structures, it is important to consider the balance between providing enough support and minimizing the amount of post-print cleanup required.
Another important design consideration for resin test prints is the orientation of the print. The orientation can affect the quality and strength of the final result. It is recommended to orient the test print in a way that minimizes the need for support structures and maximizes the surface area in contact with the build plate. This can help improve the adhesion between the print and the build plate, resulting in better overall print quality.
Hollowing out the test print is another design consideration that can save resin and reduce print time. However, it is important to note that hollowing out the print may impact its structural integrity. It is advisable to find the right balance between hollowing out the print and maintaining its strength and stability.
Choosing test prints of different sizes is also important to evaluate the printer’s performance across various scales. This can help identify any inconsistencies or limitations in the printer’s capabilities.
Troubleshooting Resin Test Prints
If you encounter issues with your resin test prints, try troubleshooting them using the following steps. First, analyze any failed prints to identify the root cause. Insufficient curing or improper exposure settings can lead to failed prints. Adjust the exposure time and curing settings accordingly. Second, examine the layer adhesion of your test prints. Poor layer adhesion can indicate problems with resin viscosity or improper curing. Adjust the resin parameters to improve layer adhesion. Third, check for overcuring or undercuring in your test prints. These issues can be resolved by adjusting the exposure time and curing settings. Fourth, inspect for warping and distortion in your prints. Inadequate support structures or incorrect print orientation can cause these issues.
Ensure that the support structures are properly placed and that the print is oriented correctly. Finally, address any inconsistencies in print quality. Fine-tune printer settings and resin parameters to achieve consistent results. Remember to consult online repositories, community forums, manufacturer guidelines, and user-created models for additional troubleshooting resources. Conducting multiple rounds of test prints with different models and settings will help refine the printing process and achieve optimal results.
Resources for Resin Test Prints
Check out these five resources for resin test prints that will help you optimize your 3d printer test print settings and achieve the best results:
Online repositories
Various websites offer a wide range of pre-designed resin test print models for free download. These repositories provide a convenient way to access a variety of test prints and experiment with different designs.
Community forums
Engaging with the 3d print test model community can provide valuable insights and recommendations for resin test prints. By participating in forums and discussions, you can learn from experienced users and benefit from their expertise.
Manufacturer guidelines
Resin printer manufacturers often provide specific test print models and guidelines for their machines. These resources are tailored to the capabilities and characteristics of their printers, making them a reliable source for optimized test prints.
User-created models
Users may share their own resin test print designs, allowing others to benefit from their experiences. These models are often based on real-world testing and can provide valuable insights into the performance of different printers and materials.
Opening Width and Height Tests
For accurate testing of your 3D printer, you should begin by examining the opening width and height. This is crucial because it directly affects the dimensional accuracy and the overall quality of your prints. To perform this test, you will need to design a simple object with an opening, such as a rectangular box or a cylindrical tube. Start by printing the object and then measure the width and height of the opening using calipers or a precision measuring tool.
Compare these measurements with the intended dimensions specified in your design. If there are any discrepancies, it may indicate issues with the printer’s calibration or mechanical components. Adjusting the printer settings or performing maintenance on the printer may be necessary to ensure accurate opening dimensions. It is important to note that this test should be repeated multiple times to ensure consistency in the results.
By carefully examining the opening width and height, you can identify and address any potential issues early on, resulting in improved print quality and overall performance of your 3D printer.
Cross-Shaped Bridges and Pillars Tests
To evaluate the performance of your 3D printer, try printing cross-shaped bridges and pillars. These tests help assess the printer’s ability to handle overhangs and unsupported structures. Here are four key aspects to consider when conducting these tests:
Bridge length
Vary the length of the cross-shaped bridges to test the printer’s ability to create unsupported spans. Start with shorter lengths and gradually increase to challenge the printer’s capabilities.
Bridge thickness
Experiment with different thicknesses for the bridges to determine the minimum thickness that the printer can reliably reproduce. This test helps assess the printer’s ability to maintain structural integrity while printing thin features.
Pillar height
Test the 3d printer test file ability to create tall, slender structures by varying the height of the pillars. Start with shorter heights and gradually increase to assess the printer’s capability to maintain stability and accuracy.
Pillar diameter
Experiment your all-in-one 3d printer test with different diameters for the pillars to evaluate the printer’s ability to create small, intricate details. This test helps determine the printer’s level of precision and its ability to reproduce fine features.
Chessboard Pattern Test
Try printing a chessboard pattern to assess your all in one 3d print test accuracy and ability to reproduce intricate details. The chessboard pattern consists of alternating squares of different colors, creating a visually complex design. By examining the edges and corners of the squares, you can evaluate the printer’s capability to produce sharp and precise features.
To perform the chessboard pattern test, you will need a 3D model of the pattern. This can be created using CAD software or obtained from online repositories. Make sure to select a pattern with small squares and clear boundaries between them. Adjust the printer settings, such as layer height and print speed, to achieve optimal results.
When printing the chessboard pattern, closely inspect the final print for any imperfections. Pay attention to the sharpness of the edges, the uniformity of the squares, and the overall level of detail. Look for any signs of distortion, warping, or inconsistent layering. These issues may indicate problems with the printer’s calibration or mechanical components.
XY Resolution Capabilities
Assessing the capabilities of your 3D printer’s XY resolution can be done by testing ledges with variable thickness. This test helps evaluate the printer’s ability to accurately reproduce fine details and intricate features in the XY plane. To assess the XY resolution capabilities of your printer, follow these steps:
Design ledges with varying thickness
Create a test model with ledges of different widths and heights. The ledges should have smooth, straight edges and be evenly spaced.
Print the test model
Use your 3D printer to print the test model using your desired settings. Ensure that the printer is properly calibrated and the build plate is level.
Inspect the printed ledges
Once the print is complete, carefully examine the printed ledges using a magnifying glass or microscope. Look for any deviations from the original design, such as inaccuracies or rough edges.
4. Measure the dimensions: Use a caliper or other precise measuring tool to measure the width and height of each ledge. Compare these measurements to the intended dimensions to determine the printer’s XY resolution capabilities.